
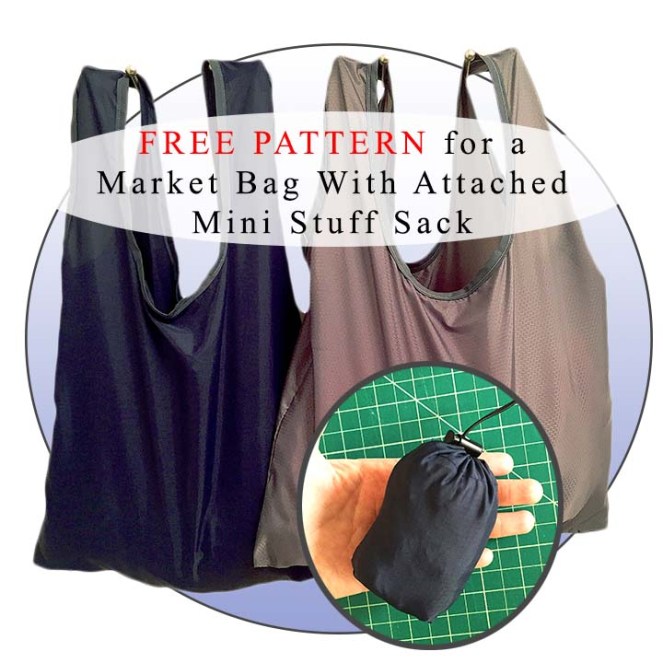
This is a pattern for a market bag with an attached stuff sack (so you don’t lose the sack) – does what it says on the tin!
It’s my first self-made pattern that actually worked. The instructions are a little detail-heavy and intended for sewing novices; if you’re an experienced sewer, just skim on through for the basics. (Heads-up: I couldn’t decide whether it was “stuff sack” or “stuffsack” (all one word), so you’ll see it both ways throughout. That’s really annoying, but going back to edit and re-upload all the photos would be more annoying. Sorry notsorry, perfectionists.)
There are lots and lots of posts on the internet for creating a portable market bag. I relied heavily on this one in particular when drafting the main bag pattern, and I also recommend this one. But I couldn’t find one that was just right – I wanted a bag that could be wadded up into a tiny attached stuff sack to keep in my purse all the time, I wanted a sack that wasn’t in the corner (I find those hard to use), I wanted the filled bag to not touch the ground even if I leaned a little, I wanted two handles for strength, I wanted to be able to put it over my shoulder if I wanted to, and I wanted it to be able to fit at least two six packs of bottles. I couldn’t find any patterns that fit all of my criteria. So I made one!
I’m still a beginner, so my bag isn’t super professional looking: my seams are a little wobbly, etc. However… it’s not bad. Really. I wouldn’t be embarrassed to use in front of people and say I made it. My goal is to get good enough that people aren’t inspired to ask, “aw, did you make that?” – I want them to be surprised that I made it! I want it to look store bought. I’m not there yet, but I’m much closer than I used to be. This bag is a pretty easy practice project, if you’re also a beginner.
As for time, I’m pretty sure all those “finish this easy sewing project in one hour” posts are just a scam.;) Unless you’re an advanced sewer, expect this project to take several hours from start to finish. I’ve made four of these bags, experimenting with sizes and techniques, and even with the pattern all cut out, it takes me about two hours to finish one. I’m not a fast sewer, so maybe if you are, you can whip one of these up in 30 minutes or so. It’s about the same complexity level as those “super-easy one hour bag!” posts I see all the time.
Materials List
Materials for the bag itself:
- 3/4 yard of fabric (and at least 51 inches tall), preferably ripstop nylon (see below for notes)
- 96 inches (that’s a little less than three yards) of coordinating 0.5 inch double-fold bias tape. Use a sturdy fabric; I used this.
- Matching polyester or nylon thread
- size 70 to 90 sharp needle, if using ripstop nylon
Extra materials for the stuff sack:
- 11 inches of drawstring cord (I used 1/16″ shock cord)
- 1 mini cordlock (I used this one)
About the Materials
About ripstop nylon fabric:
You can make this bag out of any non-stretchy fabric, and it will work as a bag. (Don’t use stretchy fabric. You’ll put something heavy in it and it will stretch down way too far.) But if you want to be able to scrunch it up into the attached stuff sack, which is just a tiny few square inches, while also using it to haul heavy stuff like groceries, you’re going to need to use ripstop nylon.
Ripstop fabric is thin fabric that has been specially woven with reinforcing thicker threads at certain intervals. The idea is that the thin fabric will be made stronger by these extra threads, and will be more resistant to tearing and rips. It often has a textured look because of the alternating thinner and thicker threads. Ripstock can be made out of most fabrics, but you most commonly see it sold as ripstock nylon (used in tents, parachutes, etc.).
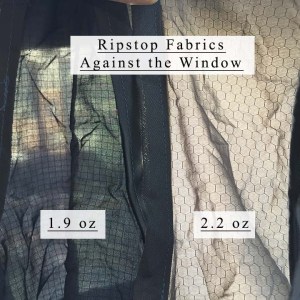
I had a hard time finding ripstop nylon at my local stores, and I bought mine online from Ripstop by the Roll. Since they carry a bunch of options, I called them with questions about the best fabric, and they recommended either the 2.2 oz HEX70 XL ripstop nylon (breathable only) or the 1.9 oz ripstop nylon. Honestly, I don’t know what difference the “breathable” makes, but they were pretty specific about it on the phone. Heads-up.
The 2.2 oz is actually pretty great. I mainly use my bags for groceries, and if liquid spills or leaks, it rolls off. It’s also a super-wide fabric at 67 inches and a little stronger than the 1.9 oz nylon. I think if I were going to make these again, I’d buy the 2.2 oz. On the other hand, it’s almost twice the price, slightly thicker and heavier than the 1.9 oz, and doesn’t have as many cute colors. At the end of the day, either one will work fine. In the pictures, the 2.2 oz is the silver fabric and the 1.9 oz is the blue fabric.
Tips for sewing with ripstop nylon:
- I prewashed the fabric, because I always do that before sewing. If I did it again, I don’t think I would prewash it. The fabric edges frayed so much in the washer and dryer that I lost a few inches, and since nylon doesn’t shrink, there’s no need to preshrink.
- Ripstop will fray like crazy. You’re going to have to french the seams to hide the edges. Make sure as you sew, you tuck any long frayed threads into the seam to hide them.
- Use a walking foot. The fabric is slinky and it will help to have feed dogs also pulling the upper fabric layer.
- Don’t use cotton thread. When you wash the bag, the cotton threads will shrink and pucker your fabric, which doesn’t shrink.
- Use a small-diameter sharp needle, preferably a size 70 to 90. If you can hear the needle “punching” through the fabric as you sew, your needle is too big and will be needlessly making larger holes in your fabric. A “sharp” is a style of needle designed for woven fabric. A “universal” needle should also work, but I tried a ball point and it resulted in skipped stitches.
- Don’t make your stitches tiny. It will be like perforating the fabric. I kept the stitch length at my machine’s default, 2.5. Google now tells me that it should have been a little longer, with about 8 – 10 stitches per inch.
- Ripstop will melt if you iron at too high a temperature. They say this about so many fabrics, but this was the first time I actually ruined fabric by using too high of a setting: it got crunchy and wrinkled. If the iron isn’t sliding smoothly across the fabric, your heat setting is probably too high. On my iron, I found that a setting halfway between polyester and wool worked best.
- Tension: I never did get this right. I lowered the tension as advised but still wound up with skipped stitches. There are ten or so tension fixes I could still try, but frankly, I’m sick of sewing this bag and ran out of fabric. I’m still a beginner, and this fabric is hard to sew. Have patience. It’s just a grocery bag!
The Pattern
This pattern is sized for me. I’m 5’6″, and this bag won’t touch the ground, even if my hand stretches down a little due to the weight of heavy items in the bag. If you’re taller, I’d still keep this same bag size, as it’s pretty big. If you’re shorter, you may want to shorten the bag by a few inches at the bottom.
Pattern Layout
You can either print this pattern at home from a PDF, or draw your own pattern by measuring rectangles. Either way, the layout on the fabric will be the same.
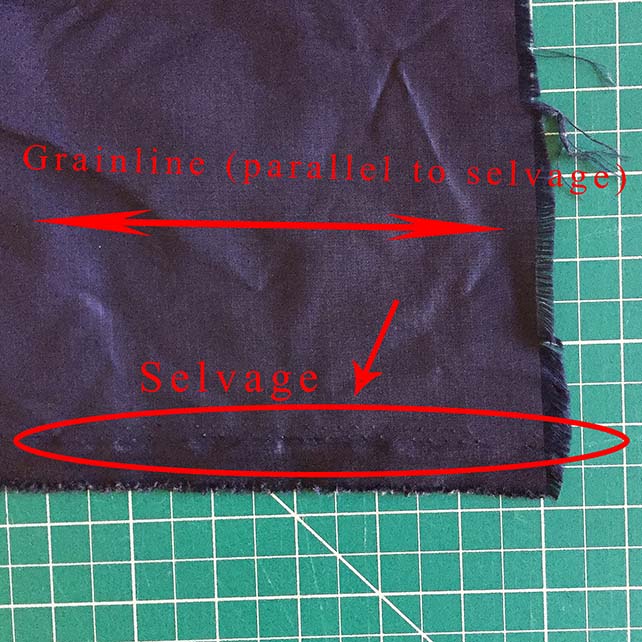
The grainline should run horizontally across the bag. If you’re new to sewing, the fabric grain is the direction of the warp threads when the fabric is woven on the loom. As a rule of thumb, you want your grain to run in the direction where you want the most stretch. Here, I want the bag to stretch horizontally, not toward the ground. Therefore, the grain runs parallel to the ground across the bag, not up and down.
You can find the grain because it runs parallel to the selvage, or the edge of the fabric. The selvage is the factory edge of the fabric that will have a little strip on it, like holes.
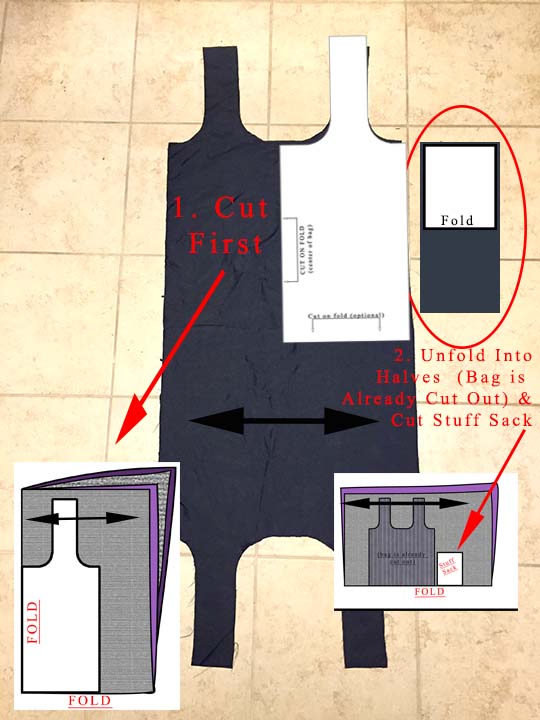
The fabric can be laid out a few ways. The best way is to fold your fabric in half, then half again the opposite way. You’ll wind up with a rectangle, with a fold on the left and a fold on the bottom. The stuff sack will be cut out beside the main bag, but the fabric will have to be unfolded first to cut the stuff sack.
This two-fold method will have a continuous strip of fabric, only broken at the handles and the sides. This will be a stronger bag.
Make sure you iron your fabric before cutting it, or it won’t turn out correctly.
As you cut, the fabric may slip on itself, and since you are cutting four layers (two folded layers), you may have a little slippage.You can avoid this slippage by sandwiching the fabric between tissue paper as you cut it, but that’s pretty annoying to do. I just folded the fabric once, ironed the fold to help it hold, then folded and ironed again. The pressed folds held the fabric fine for purposes of cutting.
Print Pattern From PDF
Download and print the pattern here: Market Bag Printable PDF Pattern. It will print as five pages. Print without scaling at actual size, cut them out along the red dotted lines, and tape the pages together as indicated. Then cut out the pattern pieces.
Draw Your Own Pattern
If you don’t have a printer, you can also draw the pattern yourself onto paper. The bag is just two rectangles: one for the body and one for the handle. The stuff sack is a separate rectangle. If your paper isn’t big enough, just tape some pieces together.
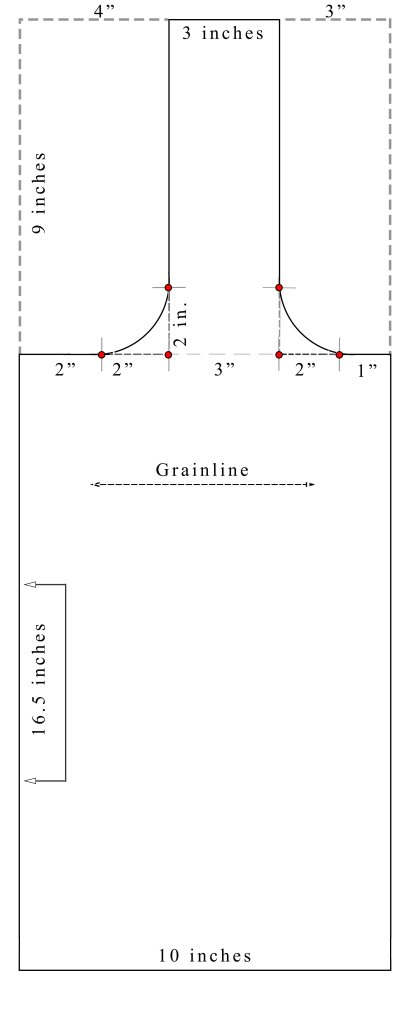
The handle curves can just be free-handed. Note that the handle is not centered on the bag, since you want the handles to be a little closer to the edges. The measurement diagram should be self-explanatory, but here is more explanation just in case.
- Draw the main body as a 10″ x 16.5″ rectangle.
- Measure 4 inches from the top left of the rectangle, and mark it. Measure 3 inches in from the top right of the rectangle, and mark it.
- Now draw a 3″ x 9″ rectangle, ending between those two marks.
- You should now have the basic bag drawn.
- In order to get the handle curves matching, measure two inches out from the handle corner in either direction (top and to the side). Hand-draw a curve between the two inch marks.
- The longer side should be on the left: mark it as “cut on the fold.”
- Cut out the bag!
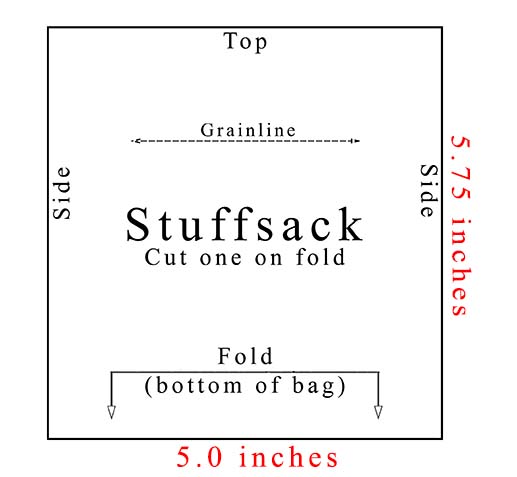
- The stuff sack is just a rectangle, 5.75″ x 5.0″ The 5.0″ sides are the top and bottom: one of these 5.0 sides should be marked “cut on fold.”
- If your priority is a smaller stuff sack, leave the measurements as-is. If your priority is easy stuffing and you’re not trying to keep the stuff sack small for a purse or whatever, increase the top and bottom measurements from 5.0″ to 5 and 1/8″ or 5.25″.
Sewing Instructions
Sewing the Main Bag
If you’re an advanced sewer, here are your bag instructions: sew a french seam on the sides (1/4 finished seam allowance), sew a french seam on the handles, then finish the tops with bias tape. If your french seam technique is done differently than mine, resulting in slightly different finished measurements, that’s no big deal, but you’ll need to double check your bias tape measurements: maybe add another inch or two to each section for safety’s sake. The main bag is basic and fast; the stuff sack is a little more complex, so check the instructions for that more carefully.
If you’re a novice, here are the detailed instructions:
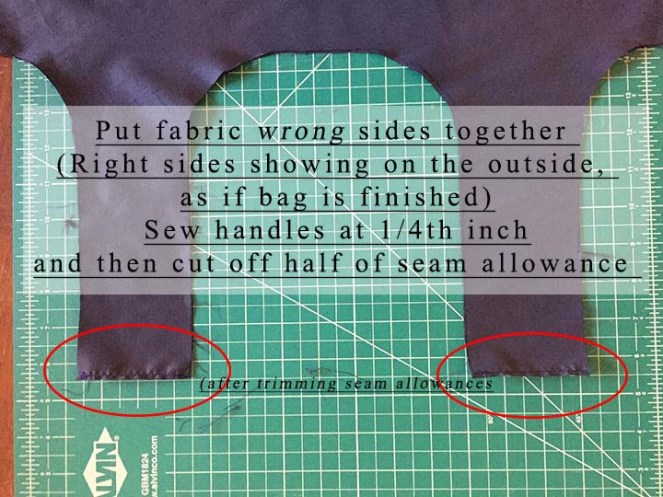
- Layout the bag with wrong sides together, the way the bag will look when it’s finished. If you’ve sewn a seam before, this is the opposite of what you normally do.
- Sew up the sides with a 1/4 inch seam allowance, and press your seam to set the threads.
- Layout the bag flat, still with wrong sides together. Cut off half of the seam allowance to leave a 1/8″ seam allowance. (Yes, you could just sew a 1/8″ seam to begin with, but getting that exact is hard for beginners. I find it easier to cut the seam allowance in half. You want to make sure that your first seam allowance is smaller than your second, and this is an easy way to achieve that.)
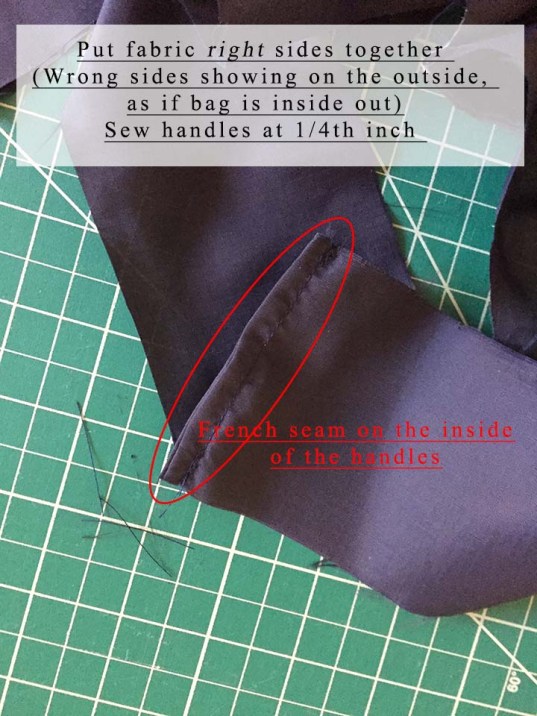
- Flip the bag inside out & iron the seams flat.
- Sew the side seams again at 1/4 inch. Your raw fabric edges will be encased inside the folded seam, which is now poking out on the wrong side of the bag, the way a seam normally does. The outside of the bag will look normal. This type of seam is called a french seam.
Do this again for the handles:
- Flip the bag right side out.
- Sew the handles together at 1/4 inch seam allowance. Iron.
- Trim half of the seam allowance off for a 1/8 inch seam allowance.
- Flip the bag inside out, iron the seam flat.
- Sew again at 1/4 inch seam allowance & iron.
Now it’s time to sew the bias tape onto the top:
- Cut your bias tape into three strips. You’ll need two strips of bias tape for the side handles (23.5 inches long each), and one 49.5 inch strip of bias tape for the top area between the handles.
- Each strip is sewn onto the bag in the same way. There are multiple tutorials for attaching bias tape out there, but this is the way that’s worked the best for me. If you have a better method, use it!
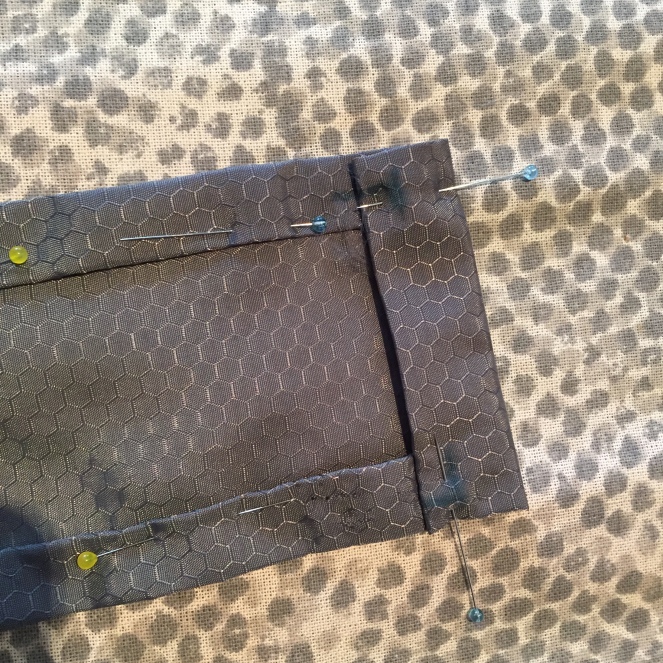
- Sew the strip into a loop. First, line up the ends of the strip right sides together and pin them. Make sure your loop isn’t twisted.
- Make a mark one inch from the end, and sew together.
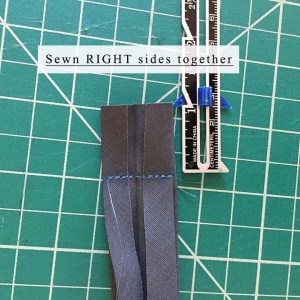
- Trim down the seam allowance and press it to the side.
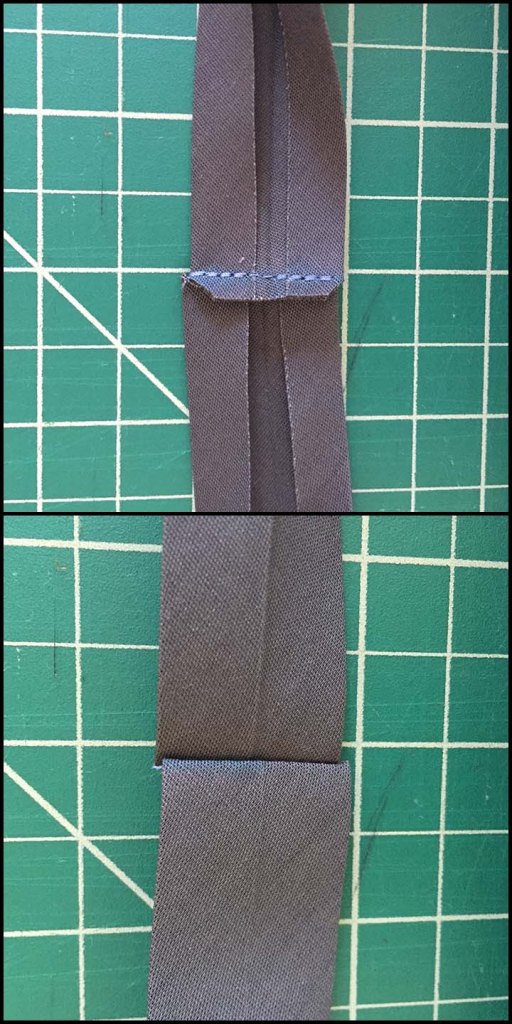
Right and wrong sides of the sewn bias tape loop, unfolded. (You’ll need to re-fold the tape for sewing. Sandwich the raw fabric edge between the folds.) 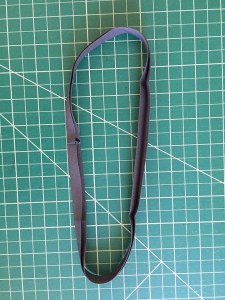
Finished bias tape loop - Open the “V” of the bias tape and insert the raw fabric edge of the bag into the “V.” The raw fabric edge will be like the meat of a sandwich, and each edge of the tape will be like the bread. The raw edges of the tape should be folded inside of it.
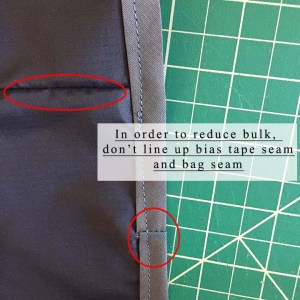
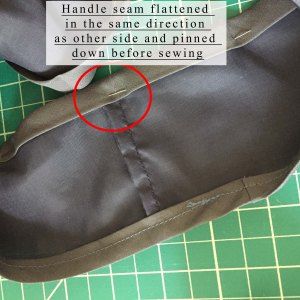
- Pin and edge stitch the bias tape onto the bag. Make sure your stitch is close to the edge of the bias tape. (I find it easiest to only pin the first part of the loop, then stop every four to five inches to manually shove the fabric against the inside of the “V.”) Also make sure your frenched handle seam is flattened in the same direction on each side of the handle.
- Backstitch at the beginning and end of the bias tape, and your main bag is done! If you aren’t using the stuff sack, you’re finished.
Sewing the Stuff Sack
This part is a little more complicated. I made a lot of these trying to find the right size. It involves a lot of ironing, so make sure your iron is set to the right setting for ripstop (again, between polyester and wool worked best for me).
As an overview, you’ll double fold the bag sides in and press them down, fold it in half inside out and sew the stuff sack into a bag shape, sew it onto the side of the larger main bag, then thread the drawstring through and attach the mini cordlock. I do the thread and the cordlock at the end so that it doesn’t get in the way when attaching the bag to the stuff sack. If you want to do it a different way, that’s fine, but do make sure that the stuff sack is sewn inside out to the inside seam of the main bag. That’s the trick to easy stuffing.
Here are the detailed instructions:
- Fold 1/8″ of the side of the bag in toward the wrong side. Press.
- Fold the top corners in toward the wrong side. Press. (This avoids the corner sticking out when you fold the top over to make a tube.)
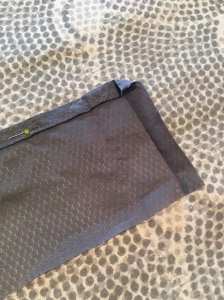
Tun the top corners down - Fold another 1/4″ of the side of the bag in toward the wrong side. Press.
- Repeat on the opposite side.
- Press it all down. Pin the sides down if they’re not staying down.
- Turn the top edge down 1/2″ toward the wrong side. Press.
- Turn the top edge down another 3/4″ toward the wrong side. Press.
- Make a mark 1/8″ from each side of the top. These marks will be where you stop sewing the top hem.
- Sew a 1/4″ seam allowance along the top edges, stopping at each 1/8″ mark.
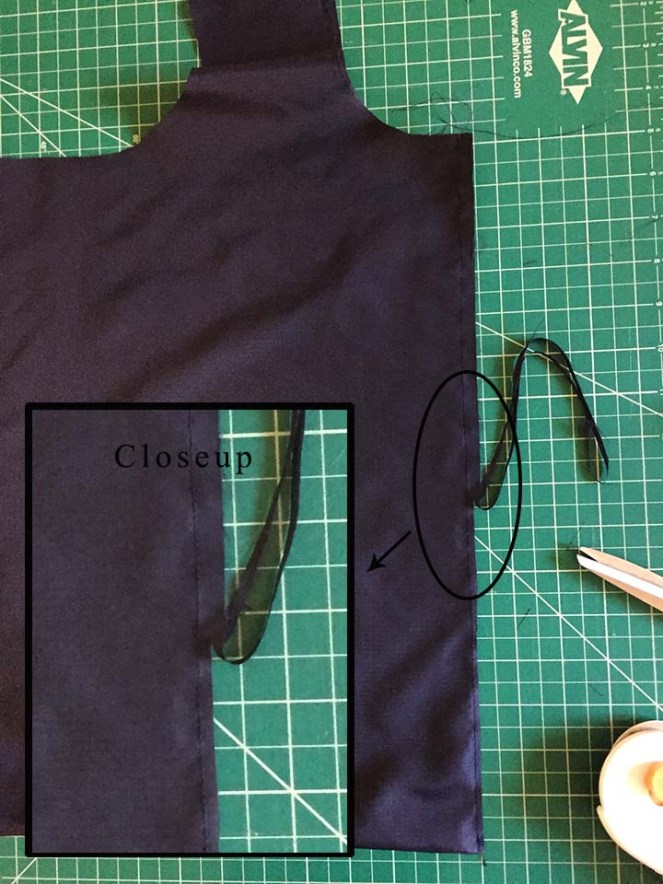
- Fold the bag in half, right sides together, and sew up the left side from the fold to the top hem. Use a 1/8″ seam allowance so that your side seam meets the edge of the top seam.
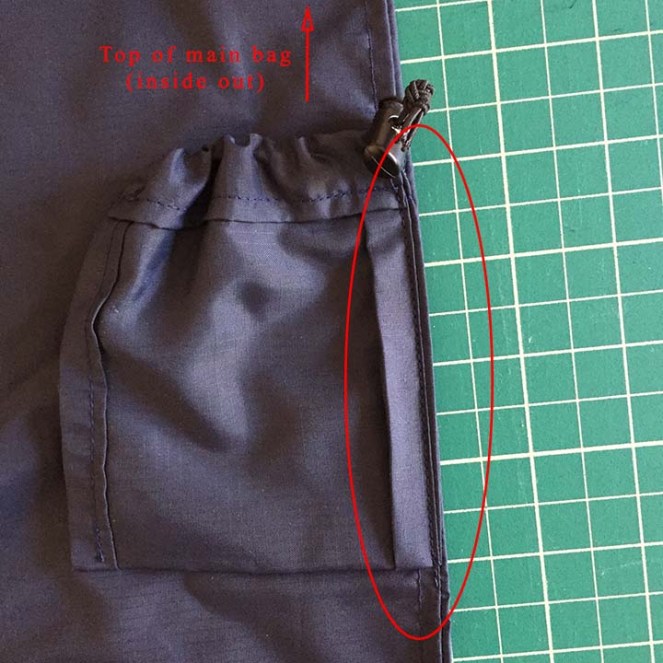
- Pin the right side of the bag, still inside out, to the right inside seam of the bag. Make sure the stuff sack and the main bag are inside out when sewing the seams together. That will make it easy to turn the stuff sack right side out, pulling the main bag into it.
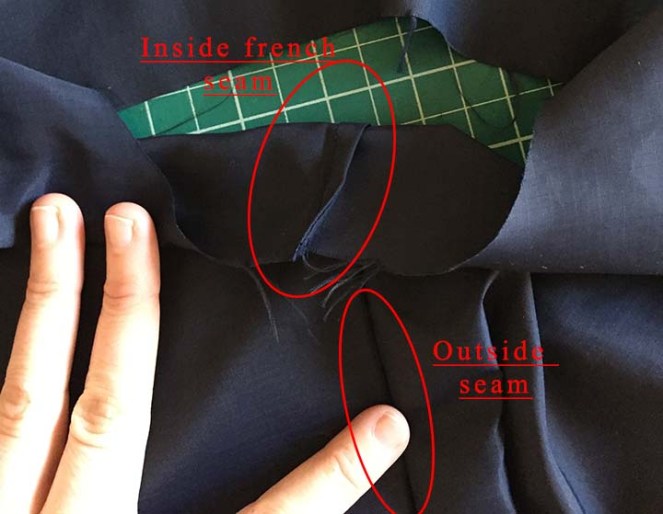
- Sew again up the side of the stuff sack and the main bag, stopping at the top hem of the stuff sack. You’ll have one seam on the stuff sack and two on the bag. Sew just a little past the bottom of the fold.
This is a finished bag – don’t thread the drawstring and the cordlock on yet. 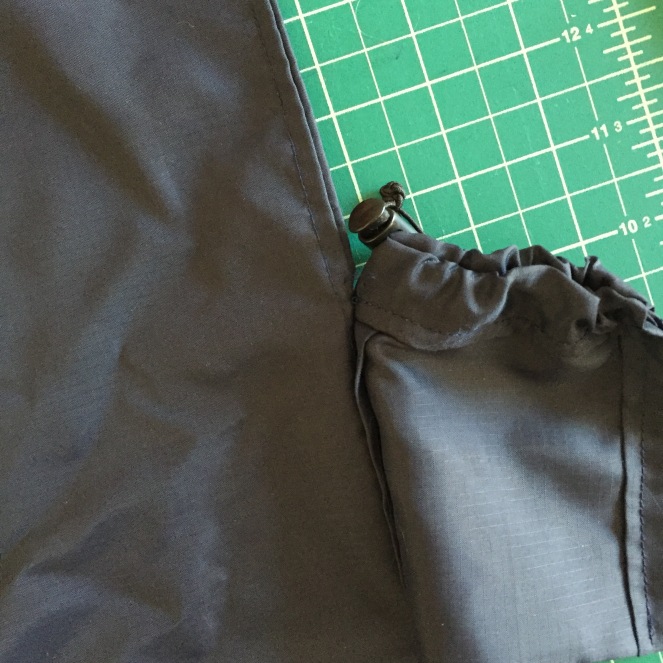
Showing that the top of the stuff sack isn’t attached. Just sew to the top hem of the stuff sack. - Run the drawstring through the tube at the top of the bag, and thread on the cordlock.
- Your bag is done!
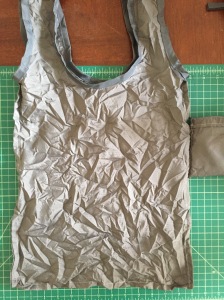
PS – Here’s the bag all wrinkly, after being stuffed inside the stuff sack all day. It doesn’t shake out nicely. If you find a resource for non-wrinkling ripstop, let me know in the comments!

I’ve used one of these bags, and they are amazing. I would definetly recommend making one!
LikeLike
Great job with the tutorial!
LikeLike
Thanks Ady! I loved your shopping bag post as well – obviously, since I linked to it.:)
LikeLike